How to Setup a Python Environment for Machine Learning?
Oct 22, 2024 4 Min Read 5640 Views
(Last Updated)
Are you struggling to set up a Python environment for Machine Learning? By the way, Python is an exciting programming language. But installing it can be a bit tricky for beginners sometimes.

So here is the guide to you along the way.
Table of contents
- The Tools you need to run Python Code
- Which is better for your computer? Miniconda or Anaconda
- System Requirements for Installing Anaconda
- #1 Operating system
- #2 System architecture
- #3 Space Requirements
- System Requirements for Installing Miniconda
- Python environment setup steps for Anaconda and Miniconda
- Download and run Setup For Anaconda- Python Environment for Machine Learning
- Download and Run Setup For Minic
- Conda-Python Environment for Machine Learning
- How to Verify Anaconda / Miniconda Installation
- Windows
- Mac
- Linux
- How to Check Anaconda/ Miniconda Package Details
- How to Update Anaconda and Miniconda
- How to Install Additional Python Libraries in Anaconda/Miniconda
- How to Remove Libraries in Anaconda/Miniconda
- How to Search Libraries in Anaconda/Miniconda
- How to Update Libraries in Anaconda Prompt
- How to Install Jupyter Notebook in Anaconda Prompt
- Conclusion
The Tools you need to run Python Code
Before installation of python and setup of python Environment, let’s see the python tools, which are used to run python code.
The following tools are used to run python code.
You can easily download any of the above from the above-mentioned links. Just install it directly by double-clicking on the downloaded setup. And then follow the instruction up to the finish button.
You can use any of the above to write and run a Python script. However, for Data Analysis, Machine Learning programming, and Deep Learning programming, we have to use Anaconda or Miniconda because
- Firstly, it can be difficult to set up a python machine learning environment on some platforms.
- And secondly, if we need to install a python tool and then install other necessary packages. This can be a confusing task for a beginner user.
Make sure you understand machine learning fundamentals like Python, SQL, deep learning, data cleaning, and cloud services before we explore them in the next section. Consider joining GUVI’s Artificial Intelligence & Machine Learning Course, which covers tools like Pyspark API, Natural Language Processing, and many more and helps you get hands-on experience by building real-time projects.
Additionally, to better understand Python, consider enrolling in GUVI’s Python course to help you with the fundamentals of this widely used programming language.
Which is better for your computer? Miniconda or Anaconda
Before we start the setup of Miniconda or Anaconda, you have to first understand what would be a good choice for your computer?
- If you install Miniconda then you don’t need to take care of memory space.
- On the other hand, for Anaconda, you need a minimum of 5GB of memory space. Otherwise, your computer will not respond. Or your program will not work properly on your computer.
![]()
Firstly, let’s see the system requirements of installing Anaconda and Miniconda
System Requirements for Installing Anaconda
To set up Anaconda on your computer, first, check the following system requirements.
#1 Operating system
Windows 8 or later, 64-bit macOS 10.13 or later, Linux including Ubuntu, RedHat, CentOS 6 or later.
If your operating system is older, you can find older versions of the Anaconda installers here.
#2 System architecture
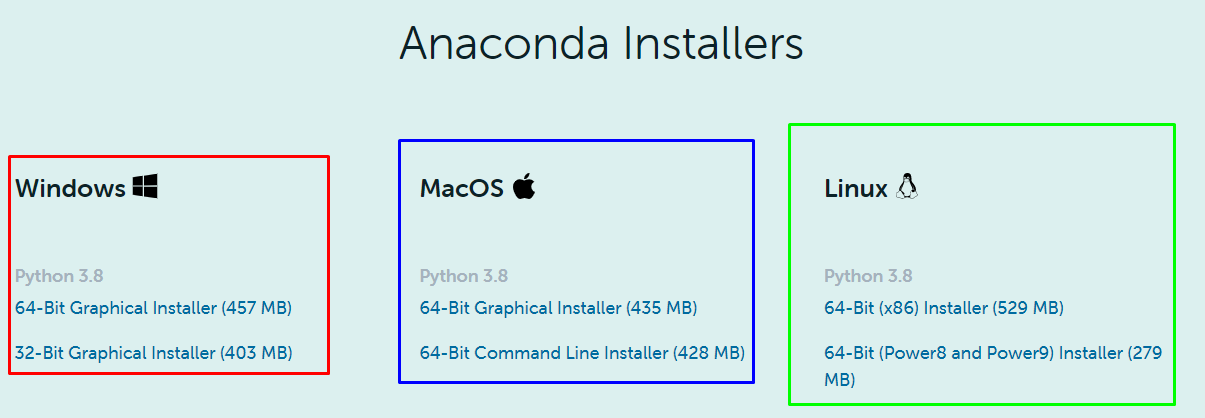
Windows- 64-bit x86, 32-bit x86; MacOS- 64-bit x86; Linux- 64-bit x86, 64-bit Power8/Power9.
#3 Space Requirements
Minimum 5 GB disk space is required to download and install. If you have less space, you can install Miniconda instead of Anaconda. The commands are similar for both.
System Requirements for Installing Miniconda
The above system requirement is also applicable to Miniconda excluding memory space.
Python environment setup steps for Anaconda and Miniconda
Before we dive into the python environment setup steps for Anaconda and Miniconda let’s take a look at basic OS procedures.
- These steps are common for Windows, Mac OS X, and Linux Platforms
- But there is only one difference when we use Windows systems. There we need to open a command prompt and write command accordingly
- And for Mac OS X or Linux, we need to open a terminal and write commands accordingly.
Download and run Setup For Anaconda- Python Environment for Machine Learning
1. Download Anaconda setup from its website
- Open the Anaconda Package link on any browser
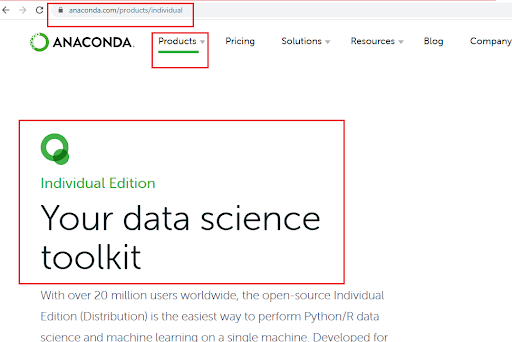
- Click on Download Button
- Choose Anaconda 32 bit or 64-bit Installer as per your platform (Windows, OS X, Linux) requirement
2. Run Anaconda Setup
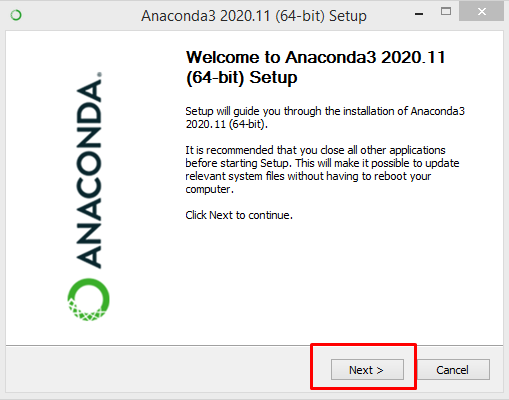
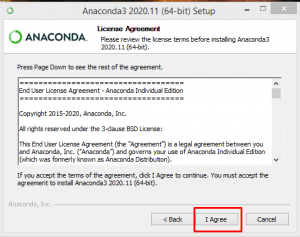
- To run Anaconda setup, double click on downloaded Anaconda setup. You may also perform this by right-clicking on setup. Then run it as Run as administrator.

- Then follow the instruction up to the finish button.
Download and Run Setup For Minic
Conda-Python Environment for Machine Learning
1. Download Miniconda setup from its website
- Open the Miniconda Package link on any browser.
![]()
- Click on the Miniconda Installer link as per your platform (Windows, OS X, Linux).
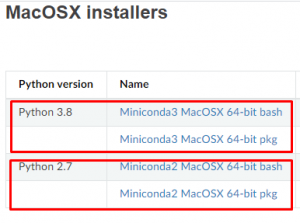
- Click on Python version 2 or 3 for 32 bit or 64-bit Installer link as per your platform (Windows, OS X, Linux) requirement
![]()
![]()
2. Run Miniconda Setup
- To run Miniconda setup.
- Double click on downloaded Miniconda setup (or)
- Right-click on setup and run it as Run as administrator.
![]()
Then follow the instruction up to the finish button.
![]()
![]()
Note:
To run setup in Mac OS X or Linux/Ubuntu, we can use the terminal also.
For example, Anaconda installation on Linux/Ubuntu:
- Anaconda/ Miniconda Running steps For Windows

How to Verify Anaconda / Miniconda Installation
1. Windows
We can check Anaconda / Miniconda Installation on windows in two ways.
- Open a system command prompt and write the command as conda.
- Open Anaconda prompt from system menu options by searching anaconda in the search tab.
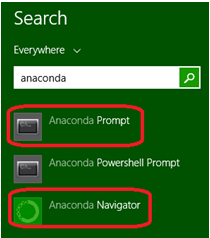
Note: Don’t use Miniconda and Anaconda together. We can check the conda version by writing the command as conda -V in the system/Anaconda prompt.
2. Mac
We can check Anaconda / Miniconda Installation on Mac in two ways.
- Open a terminal and write the command as conda.
![]()
- Open spotlight searches and write Anaconda to open Anaconda terminal.

Note: The steps of windows installation from 3 to 7 is the same for Mac OS X. But only use terminal and spotlight search instead of command prompt and search bar of windows respectively.
3. Linux
We can check Anaconda / Miniconda Installation on Linux – Ubuntu in two ways.
- Open application — > System Tools — > Terminal and write command as conda for Linux-CentOS (or)
- Open Dash by clicking the upper left Ubuntu Icon — > Type terminal and write command as conda for Linux-Ubuntu
![]()
- Then, open the search bar of Linux and write Anaconda to open the Anaconda terminal.
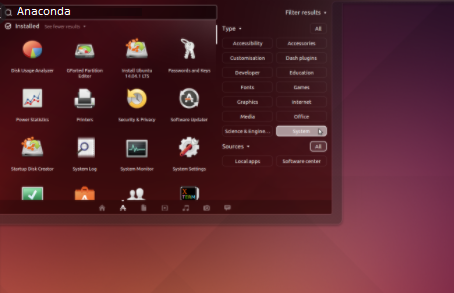
Note: The steps of windows installation from 3 to 7 is the same for Linux/Ubuntu. But only use terminal and respective search tab instead of command prompt and search bar of windows respectively.
How to Check Anaconda/ Miniconda Package Details
- We can check Anaconda/Miniconda packages by writing commands as conda list in the system/Anaconda command prompt.
![]()
How to Update Anaconda and Miniconda
We can confirm the conda environment is up-to-date by writing commands as
- conda update conda for miniconda
- conda update anaconda for Anaconda
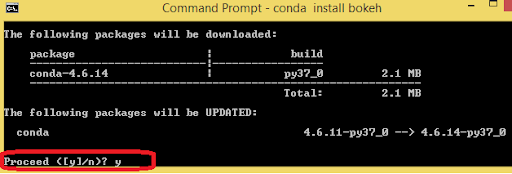
How to Install Additional Python Libraries in Anaconda/Miniconda
We can add any machine learning, deep learning, and data science library file in Anaconda/Miniconda by using two package managers as pip and conda.
Syntax
To install any additional python libraries by using conda, we use the command as
- conda install <library names> (or)
- conda install -c anaconda <library file>=<version> in the system/Anaconda command prompt
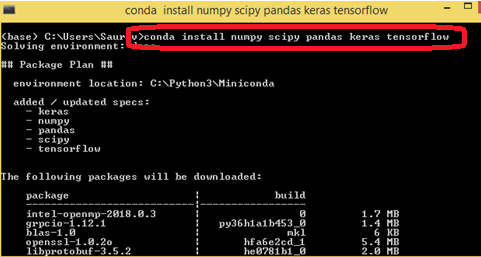
Example: conda install numpy scipy pandas keras tensorflow scikit-learn
How to Remove Libraries in Anaconda/Miniconda
Syntax
To remove any python libraries, we use commands such as conda remove <library name> in the system/Anaconda command prompt.
Example:
conda remove numpy
How to Search Libraries in Anaconda/Miniconda
To search any python libraries, we use the command as conda search *library name* in the system/Anaconda command prompt.
Example: conda search *numpy*
When some packages aren’t available with conda, we can use pip to install them by writing the command as ‘pip install <library name> in Anaconda Prompt.
![]()
How to Update Libraries in Anaconda Prompt
We can easily update any library file as per our requirements. This can be achieved by writing the below commands in the system/Anaconda prompt.
Syntax:
You can use either of the following
- conda update <library name>
- conda update <library name>=<version>
Example:
- conda update scikit-learn
- conda update scikit-learn=0.18.1
How to Install Jupyter Notebook in Anaconda Prompt
To write a python script, we need a jupyter notebook or any other python text editor. Then launch Jupyter Notebook by installing it. To install it use the command as conda install jupyter notebook in system/Anaconda prompt.

Now, to run Jupyter Notebook Server, open the system/Anaconda prompt again. And write command as jupyter notebook

(OR)
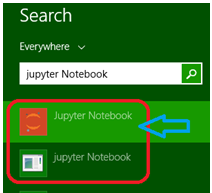
Search jupyter Notebook at the search bar. Then click on the Jupyter Notebook shell (See below image with a blue arrow).
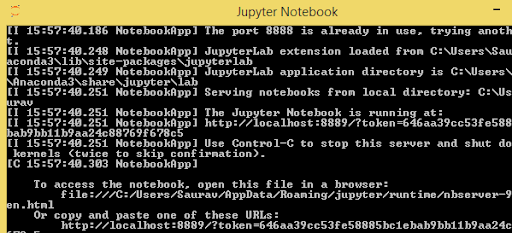
After running the server, the jupyter notebook will open in your default browser.
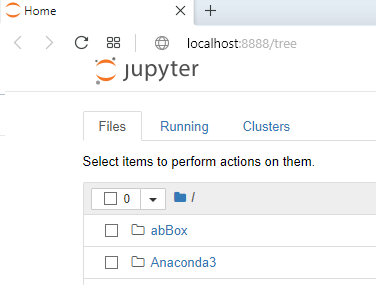
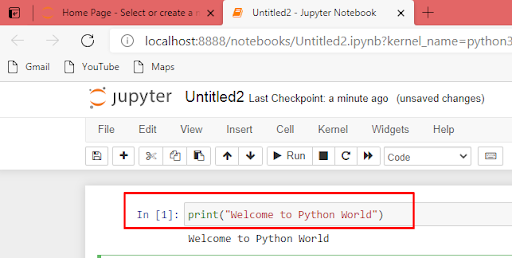
You can write your first python program by selecting python 3 at the New dropdown of the jupyter notebook.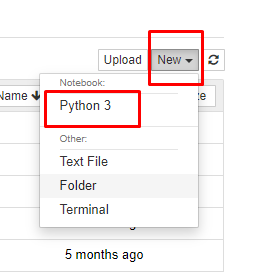
Conclusion
Machine learning is often used in search engines. They are used in email filtering to weed out junk and sites to make personalized reviews. Also, in financial tools to spot suspicious purchases. Machine Learning is also present in many applications on various devices, such as speech recognition.
Here, your setup is complete. Now you can enjoy the prospects of Machine learning.
Kickstart your Machine Learning journey by enrolling in GUVI’s Artificial Intelligence & Machine Learning Course where you will master technologies like matplotlib, pandas, SQL, NLP, and deep learning and build interesting real-life machine learning projects.
To enhance your understanding of Python, you might consider signing up for GUVI’s Python course, which is designed to strengthen your grasp of the fundamentals of this popular programming language.





Did you enjoy this article?