ReactJS Tutorial: Crafting a ToDo List Application in 5 Simple Steps (Code Included)
Mar 25, 2025 6 Min Read 18158 Views
(Last Updated)
Embarking on your journey to create a ToDo List application can be exhilarating without the right ReactJS tutorial guiding you through.
React, known for its efficiency in building dynamic user interfaces, offers tools like state management and event handling that are pivotal when dealing with tasks such as utilizing forms, making API calls with AJAX, or maintaining application state.
This article promises a hands-on approach to understanding these React concepts, handling AJAX for dynamic content retrieval, manipulating state for task management, and more.
Navigate through the creation of your app from setting up your React project to styling it, ensuring a rich learning experience teeming with practical code examples to bolster your development skills.
Table of contents
- Build your ToDo List Application in 5 Easy Steps:
- 1) Setting Up Your React Project
- 2) Building the App Component
- 3) Creating the TodoList Component
- 4) Implementing the TodoItem Component
- The code for all of these steps that we've discussed above will look like this in your app.jsx file:
- 5) Styling Your Todo App
- All your CSS styling will be in a separate file, here in the app.css file, and will look like this:
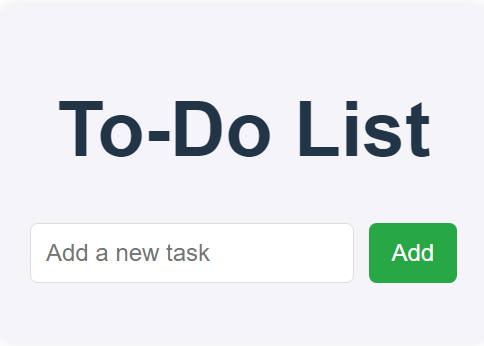
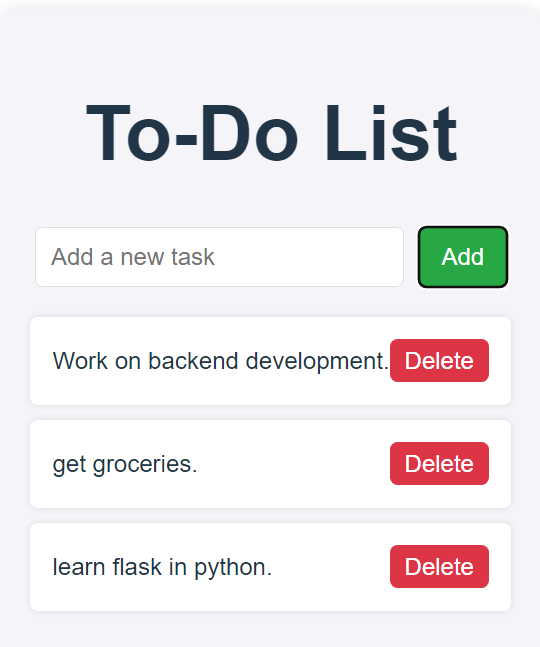
- The output after running our files together will look like this:
- Takeaways...
- FAQs
- Can I use React and Firebase together?
- Is Google Firebase free?
- What is the purpose of Firebase?
Build your ToDo List Application in 5 Easy Steps:
I’ve divided this entire project into 5 simple steps for you to follow along with leaving space for you to add your own touch and make it yours, let’s get started.
1) Setting Up Your React Project
1.1) Installing Node.js and npm
- Download and Install Node.js: First, visit the official Node.js website to download the installer. Choose the LTS (Long Term Support) version for stability and extended support.
- Install npm: Node.js installation includes npm (Node Package Manager), with essential for managing JavaScript packages.
1.2) Creating a New React App
- Install Create React App: Open your terminal and run
npm install -g create-react-appto install this utility globally. - Generate Your Project: Execute
npx create-react-app my-appto create a new directory named ‘my-app’ with all the necessary setups.
Also Read: How to Install React.js on Windows: A Complete Guide
1.3) Understanding the Project Structure
- Explore Initial Setup: Navigate to your project directory and observe the default structure provided by Create React App. Key folders include ‘public’ for static assets, ‘src’ for source files, and ‘node_modules’ for dependencies.
- Key Files: The ‘src’ folder contains ‘App.js’, the root component, and ‘index.js’, which renders the App component into the DOM.
1.4) Starting the Development Server
- Launch the Server: In your project directory, run
npm startto fire up the development server. This command compiles the app and opens it in your default web browser. - Automatic Refresh: Any changes you make in the source files will automatically refresh the app in the browser, thanks to the hot reloading feature.
This setup process leverages the Create React App toolchain, which simplifies the configuration and initial file structure, allowing you to focus on building your React application.
Before diving into the next section, ensure you’re solid on full-stack development essentials like front-end frameworks, back-end technologies, and database management. If you are looking for a detailed Full Stack Development career program, you can join GUVI’s Full Stack Development Course with Placement Assistance. You will be able to master the MERN stack (MongoDB, Express.js, React, Node.js) and build real-life projects.
Additionally, if you want to explore ReactJS through a self-paced course, try GUVI’s ReactJS certification course.
2) Building the App Component
2.1) Creating the App Component File
- Initialize the Component: Start by creating a new file in your project’s
src/componentsdirectory. Name itApp.js. This file will house your main App component, which serves as the entry point for your ToDo List application. - Define the App Component: Within App.js, define your App component as a functional component. Use the following basic structure to get started.
2.2) Importing Necessary Modules
- React and ReactDOM: At the top of your
App.jsfile, ensure you import React. This import is crucial as it allows you to use JSX and other React features.
- Additional Components: If your application will use other custom components or third-party libraries, import them at the beginning of the file. For instance, if you are using Material-UI components, you might add.
- CSS Files: To style your component, import the necessary CSS files at the top of your component file.
2.3) Rendering the First Component
- Create Root Element: In your project’s
src/index.js, set up the root for your React application by importingReactDOMand pointing it to the appropriate DOM element:
- Display the App Component: The
ReactDOM.createRoot()method links your React application to an existing DOM element (typically a div with the id of ‘root’ in yourpublic/index.htmlfile). Theroot.render()method then renders your App component within this root element, displaying your initial UI on the page.
By following these steps, you’ve successfully set up and rendered your primary App component, forming the foundation of your ToDo List application.
This setup allows for further expansion and integration of additional features and components as you develop your application.
Must Read: Stopwatch Using ReactJS: 4 Easy Steps to Create Your First React Application
3) Creating the TodoList Component
3.1) Managing State with useState Hook
To manage the list of tasks within your TodoList component, utilize the useState hook from React. Start by initializing the state with an empty array or a default set of tasks.
This state will hold all the tasks you add, each represented by an object with properties such as id, text, and completed status.
3.2) Handling User Input
For adding new tasks, handle user input with a controlled component approach.
Include an input field in your component’s return statement and bind it to the text state with onChange to capture user input dynamically.
3.3) Adding Tasks to the List
To add tasks to your list, create an addTask function that constructs a new task object and updates the state.
Bind this function to a button’s onClick event within your component to trigger task addition.
3.4) Displaying the List of Tasks
Use the map function to iterate over the tasks array and display each task.
Each task is rendered as a list item within an unordered list, with buttons to mark it as complete or to delete it. Implement toggleCompleted and deleteTask functions to handle these actions, updating the tasks array accordingly.
By following these steps, you’ll have a functional TodoList component that allows users to add, display, complete, and delete tasks dynamically.
Also Read: Currency Converter App Using ReactJS: A Step-by-Step Guide
4) Implementing the TodoItem Component
4.1) Creating TodoItem Component
- Initialize the Component: Begin by creating a file named
TodoItem.jsin yoursrc/componentsdirectory. This component represents each task in your ToDo list.
4.2) Passing Props for Task Handling
- Props Overview:
TodoItemreceivestask,deleteTask, andtoggleCompletedas props. These functions are crucial for manipulating the task’s state from the parent component. - Functionality:
task: Contains details of a specific task.deleteTask: Function to remove a task from the list.toggleCompleted: Function to toggle the completion status of a task.
The code for all of these steps that we’ve discussed above will look like this in your app.jsx file:
import React, { useState } from 'react';
import './App.css';

function App() {
  const [tasks, setTasks] = useState([]);
  const [input, setInput] = useState('');

  const addTask = () => {
    if (input.trim()) {
      setTasks([...tasks, { text: input, completed: false }]);
      setInput('');
    }
  };

  const toggleTask = (index) => {
    const newTasks = tasks.map((task, i) =>
      i === index ? { ...task, completed: !task.completed } : task
    );
    setTasks(newTasks);
  };

  const deleteTask = (index) => {
    const newTasks = tasks.filter((_, i) => i !== index);
    setTasks(newTasks);
  };

  return (
    <div className="app">
      <header className="header">
        <h1>To-Do List</h1>
      </header>
      <div className="input-container">
        <input
          type="text"
          value={input}
          onChange={(e) => setInput(e.target.value)}
          placeholder="Add a new task"
        />
        <button onClick={addTask}>Add</button>
      </div>
      <ul className="task-list">
        {tasks.map((task, index) => (
          <li key={index} className={task.completed ? 'task completed' : 'task'}>
            <span onClick={() => toggleTask(index)}>{task.text}</span>
            <button onClick={() => deleteTask(index)}>Delete</button>
          </li>
        ))}
      </ul>
    </div>
  );
}

export default App;
Find Out 6 Essential Prerequisites For Learning ReactJS
5) Styling Your Todo App
5.1) CSS Basics for Component Styling
- Inline Styling: Begin by applying styles directly to your components using the
styleattribute. Remember, in React, inline styles are not strings but objects with camelCased properties as keys.
- External CSS Styling: For more general styling, create a CSS file and import it into your component(as mentioned before). This method is excellent for reusable styles across multiple components.
- CSS Modules: Utilize CSS Modules for component-specific styles without worrying about global namespace pollution.
- SASS/SCSS: Leverage the power of SASS for complex styling scenarios, like nested selectors and variables, by creating a
.scssfile and importing it similarly to a regular CSS file.
Know More About Types of CSS: A Comprehensive Guide to Styling Web Pages
5.2) Applying Styles to Components
- Styled Components: Install the
styled-componentslibrary and use it to encapsulate styles within your components. This method couples the styles directly with the component logic, enhancing modularity and reusability.
- Dynamic Styling: Use props to dynamically alter styles based on component state or props. Styled Components make this particularly intuitive.
- Global Styles: Define global styles with
createGlobalStylefrom styled-components to maintain consistency across your application.
5.3) Enhancing UI with Styled Components
- Theming: Implement theming within your app to allow for style variations across different components using the same theme provider.
- Media Queries: Use media queries within styled-components to create responsive designs that adapt to various device sizes.
- Animations and Transitions: Add visual flair to your components with CSS animations and transitions to enhance user experience.
By integrating these styling techniques, your ToDo app will function well and look modern and appealing.
Must Explore: 10 Best React Project Ideas for Developers [with Source Code]
All your CSS styling will be in a separate file, here in the app.css file, and will look like this:
.app {
  font-family: Arial, sans-serif;
  text-align: center;
  background-color: #f4f4f9;
  padding: 20px;
  max-width: 500px;
  margin: 50px auto;
  border-radius: 10px;
  box-shadow: 0 0 10px rgba(0, 0, 0, 0.1);
}

.header {
  margin-bottom: 20px;
}

.input-container {
  display: flex;
  justify-content: center;
  margin-bottom: 20px;
}

.input-container input {
  width: 70%;
  padding: 10px;
  font-size: 16px;
  border: 1px solid #ddd;
  border-radius: 5px;
  outline: none;
}

.input-container button {
  padding: 10px 15px;
  font-size: 16px;
  margin-left: 10px;
  border: none;
  border-radius: 5px;
  background-color: #28a745;
  color: white;
  cursor: pointer;
}

.input-container button:hover {
  background-color: #218838;
}

.task-list {
  list-style: none;
  padding: 0;
}

.task {
  background-color: white;
  padding: 15px;
  margin-bottom: 10px;
  border-radius: 5px;
  display: flex;
  justify-content: space-between;
  align-items: center;
  box-shadow: 0 0 5px rgba(0, 0, 0, 0.1);
  cursor: pointer;
}

.task.completed {
  text-decoration: line-through;
  color: #888;
}

.task button {
  background-color: #dc3545;
  border: none;
  color: white;
  padding: 5px 10px;
  border-radius: 5px;
  cursor: pointer;
}

.task button:hover {
  background-color: #c82333;
}
The output after running our files together will look like this:

As you can see above, you can add whatever tasks you would like to in the ‘Add a new task’ box and then click on ‘Add’.
You can add as many tasks as you want and also delete them using the ‘Delete’ button as shown in the image below. Cool right? How we can just make stuff like this!

Kickstart your Full Stack Development journey by enrolling in GUVI’s Full Stack Development Course with Placement Assistance where you will master the MERN stack (MongoDB, Express.js, React, Node.js) and build interesting real-life projects. This program is crafted by our team of experts to help you upskill and assist you in placements.
Alternatively, if you want to explore ReactJS through a self-paced course, try GUVI’s ReactJS certification course.
Takeaways…
Through the guidance offered in this article, readers now possess the foundational knowledge required to embark on creating a dynamic ToDo List application using ReactJS.
We covered essential phases from setting up the React project, crafting the App and TodoList components, to meticulously styling the application for an appealing user interface.
The significance of this tutorial extends beyond just the creation of a ToDo list; it lays down the groundwork for understanding React’s core functionalities such as component creation, state management, and the use of hooks.
This not only aids in building more complex applications but also in appreciating React’s efficient rendering and state management capabilities.
As readers continue to refine their skills, exploring further into areas like context API or Redux for state management on a larger scale could be the next step.
Also Explore: 6 Compelling Reasons to choose ReactJS over AngularJS
FAQs
Yes, React and Firebase can be used together. React provides the front-end framework, while Firebase offers backend services like authentication, real-time database, and hosting, making it easier to build full-featured web applications.
Google Firebase offers a free tier called the Spark Plan, which includes limited usage of core features such as authentication, Firestore database, and hosting. For more extensive usage, you can upgrade to a paid plan.
Firebase is a platform developed by Google for building mobile and web applications. It provides a variety of tools and services, including real-time databases, authentication, analytics, cloud storage, and serverless functions, to help developers build, manage, and grow their apps efficiently.


![9 Compelling Project Ideas for Frontend Development [With Source Code] 4 Feature image - Comprehensive List of Project Ideas for Frontend Development](https://www.guvi.in/blog/wp-content/uploads/2024/02/Project-Ideas-for-Frontend-Development.webp)
![Top Full Stack Web Developer Coding Projects in 2025 [With Source Code] 5 Full Stack Web Developer Coding Projects](https://www.guvi.in/blog/wp-content/uploads/2021/10/The-Good-Life-GoDaddy-Store-Image-10-600x250.jpg)


![10 Impressive Data Visualization Project Ideas [With Source Code] 10 Data Visualization Project Ideas](https://www.guvi.in/blog/wp-content/uploads/2024/11/best_data_visualization_project_ideas_with_source_code_.webp)

Did you enjoy this article?